
When I began as a JavaScript editor at SitePoint, our submission process was something of a mess — articles coming from every direction in a variety of formats. So we decided to standardize things and settled on submission via GitHub in Markdown.
This was a step forward, but we still needed to convert the Markdown into HTML for our WordPress back end. The powers that be at SitePoint HQ had vetoed the installation of any WordPress plugins, which made us consider if we could accomplish this task with a browser extension. Luckily we could!
In the following post, I’m going to demonstrate how you can build your own Chrome extension to add additional functionality to WordPress. I’ll also introduce you to SP-Tools, the extension we use at SitePoint to make life as an editor that little bit easier.
The Anatomy of a Chrome Extension
Despite what you might think, building a Chrome extensions isn’t difficult. Let’s start by looking at the various components.
Parts of the following section are borrowed from another tutorial I wrote about building a Chrome extension using Vue.js.
The core piece of any Chrome extension is a manifest file. This is in a JSON format and provides important information about an extension, such as its version, resources, or the permissions it requires.
A manifest file won’t do much on its own, so we can use a content script to add some functionality. Content scripts are files that “run in the context of web pages”. That is to say, you specify the URL in your manifest file, then when your browser visits a page whose address matches the URL you specified, the content script is injected into the page and run.
To demonstrate these concepts, let’s start by writing a Chrome extension to do something on the SitePoint main site.
Make a new folder called my-extension and two files, manifest.json and main.js:
mkdir my-extension
cd my-extension
touch manifest.json main.js
Open up manifest.json and add the following code:
{
  "name": "My Extension",
  "version": "0.0.1",
  "manifest_version": 2,
  "content_scripts": [
    {
      "matches": [ "*://*.sitepoint.com/*" ],
      "js": [ "main.js" ]
    }
  ]
}
The name, version and manifest_version are all required fields. The name and version fields can be whatever you want; the manifest version should be set to 2 (as of Chrome 18).
The content_scripts key allows us to register a content script (main.js), which will be run whenever we visit SitePoint. Notice how we can use match patterns to specify parts of the URL, such as the protocol.
Now let’s add the following code to main.js to make the browser say hello whenever we visit SitePoint:
alert('Hello there!');
Finally, let’s install the extension. Open Chrome and enter chrome://extensions/ in the address bar. You should see a page displaying the extensions you’ve installed.
As we want to install our extension from a file (and not the Chrome Web Store) we need to activate Developer mode using the toggle in the top right-hand corner of the page. This should add an extra menu bar with the option Load unpacked. Click this button and select the my-extension folder you created previously. Click Open and the extension will be installed.
Now when you visit SitePoint, this will happen:
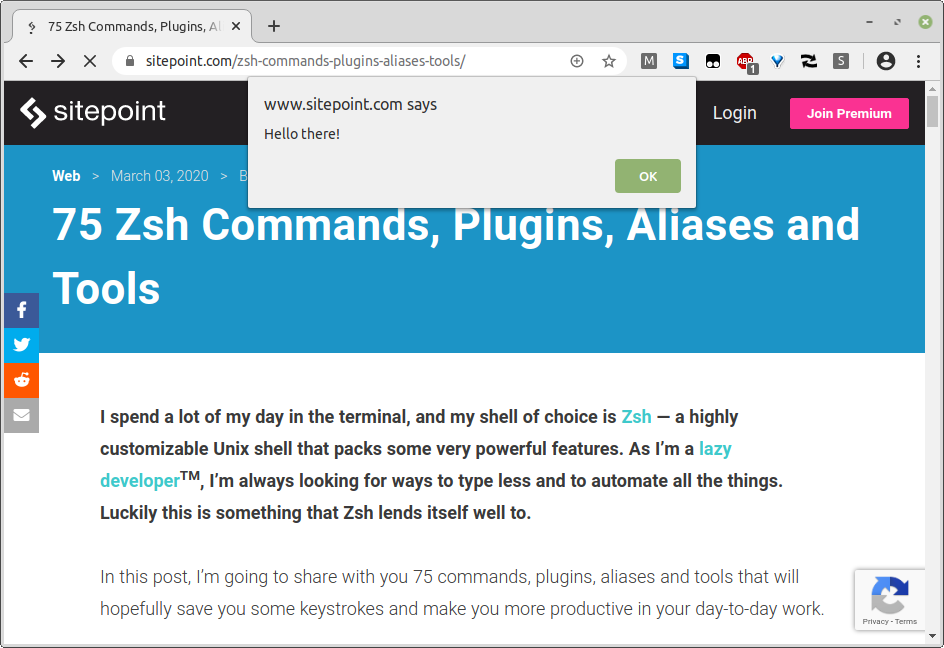
Congratulations! You just made a Chrome extension.
Background Scripts and Message Passing
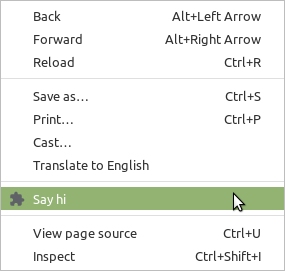
So, that popup is pretty annoying right? To finish off this section, let’s add a context menu entry to fire it off manually, instead of having it appear on every page load.
This introduces us to another important component of Chrome extensions — background scripts. These scripts can react to browser events (such as a user clicking a context menu entry) and they have full access to Chrome’s APIs. However, they don’t have access to the current page, and rely on message passing to communicate with content scripts.
Update the manifest like so:
{
  "name": "My Extension",
  "version": "0.0.1",
  "manifest_version": 2,
  "permissions": [ "contextMenus" ],
  "content_scripts": [
    {
      "matches": [ "*://*.sitepoint.com/*" ],
      "js": [ "main.js" ]
    }
  ],
  "background": {
    "scripts": ["background.js"],
    "persistent": false
  }
}
Notice that we’re requesting the contextMenus permission, as we want to add something to the context menu, and that we’ve registered a non-persistent background script. Making the background script non persistent allows it to be unloaded when it’s not needed.
Next, create a background.js file and add:
chrome.runtime.onInstalled.addListener(() => {
  chrome.contextMenus.create({
    id: 'greet',
    title: 'Say hi',
    contexts: ['page'],
    documentUrlPatterns: ['*://*.sitepoint.com/*'],
  });
});

chrome.contextMenus.onClicked.addListener((info, tab) => {
  if (info.menuItemId === 'greet') {
    chrome.tabs.sendMessage(tab.id, { text: 'greet' }, (res) => {
      console.log(res);
    });
  }
});
We register the context menu entry when the extension is installed, then add an event listener to send a message to our content script whenever the entry is clicked.
Change main.js like so:
chrome.runtime.onMessage.addListener((msg, sender, sendResponse) => {
  if (msg.text === 'greet') {
    alert('hi');
    sendResponse('I greeted the user');
  }
});
Here, we listen for a message from our background script. If it has a text of “greet”, we then fire off the alert and send back a message informing the background script that we did what was requested.
To try this out, head back to the extensions page (at chrome://extensions/), then click the reload icon and reload any SitePoint page. When you right click, you should now see a context menu entry.
Enhancing WordPress’ Functionality with a Chrome Extension
Now that we’ve familiarized ourselves with the basic components of a Chrome extension, let’s look at how we can make some additions to WordPress’ functionality.
To follow along with this section, you’ll need a working installation of WordPress. I installed mine locally. It’s running on an Apache server at http://localhost/wp.
The code for this extension can be found on GitHub.
The post Build a Chrome Extension to Streamline Your Workflow appeared first on SitePoint.
