Browser developer tools provide an amazing array of options for delving under the hood of websites and web apps. These capabilities can be further enhanced and automated by third-party tools. In this article, we’ll look at Puppeteer, a Node-based library for use with Chrome/Chromium.
The puppeteer website describes Puppeteer as
a Node library which provides a high-level API to control Chrome or Chromium over the DevTools Protocol. Puppeteer runs headless by default, but can be configured to run full (non-headless) Chrome or Chromium.
Puppeteer is made by the team behind Google Chrome, so you can be pretty sure it will be well maintained. It lets us perform common actions on the Chromium browser, programmatically through JavaScript, via a simple and easy-to-use API.
With Puppeteer, you can:
- scrape websites
- generate screenshots of websites including SVG and Canvas
- create PDFs of websites
- crawl an SPA (single-page application)
- access web pages and extract information using the standard DOM API
- generate pre-rendered content — that is, server-side rendering
- automate form submission
- automate performance analysis
- automate UI testing like Cypress
- test chrome extensions
Puppeteer does nothing new that Selenium, PhantomJS (which is now deprecated), and the like do, but it provides a simple and easy-to-use API and provides a great abstraction so we don’t have to worry about the nitty-gritty details when dealing with it.
It’s also actively maintained so we get all the new features of ECMAScript as Chromium supports it.
Prerequisites
For this tutorial, you need a basic knowledge of JavaScript, ES6+ and Node.js.
You must also have installed the latest version of Node.js.
We’ll be using yarn throughout this tutorial. If you don’t have yarn already installed, install it from here.
To make sure we’re on the same page, these are the versions used in this tutorial:
- Node 12.12.0
- yarn 1.19.1
- puppeteer 2.0.0
Installation
To use Puppeteer in your project, run the following command in the terminal:
$ yarn add puppeteer
Note: when you install Puppeteer, it downloads a recent version of Chromium (~170MB macOS, ~282MB Linux, ~280MB Win) that is guaranteed to work with the API. To skip the download, see Environment variables.
If you don’t need to download Chromium, then you can install puppeteer-core:
$ yarn add puppeteer-core
puppeteer-core is intended to be a lightweight version of Puppeteer for launching an existing browser installation or for connecting to a remote one. Be sure that the version of puppeteer-core you install is compatible with the browser you intend to connect to.
Note: puppeteer-core is only published from version 1.7.0.
Usage
Puppeteer requires at least Node v6.4.0, but we’re going to use async/await, which is only supported in Node v7.6.0 or greater, so make sure to update your Node.js to the latest version to get all the goodies.
Let’s dive into some practical examples using Puppeteer. In this tutorial, we’ll be:
- generating a screenshot of Unsplash using Puppeteer
- creating a PDF of Hacker News using Puppeteer
- signing in to Facebook using Puppeteer
1. Generate a Screenshot of Unsplash using Puppeteer
It’s really easy to do this with Puppeteer. Go ahead and create a screenshot.js file in the root of your project. Then paste in the following code:
const puppeteer = require('puppeteer')

const main = async () => {
  const browser = await puppeteer.launch()
  const page = await browser.newPage()
  await page.goto('https://unsplash.com')
  await page.screenshot({ path: 'unsplash.png' })

  await browser.close()
}

main()
Firstly, we require the puppeteer package. Then we call the launch method on it that initializes the instance. This method is asynchronous as it returns a Promise. So we await for it to get the browser instance.
Then we call newPage on it and go to Unsplash and take a screenshot of it and save the screenshot as unsplash.png.
Now go ahead and run the above code in the terminal by typing:
$ node screenshot
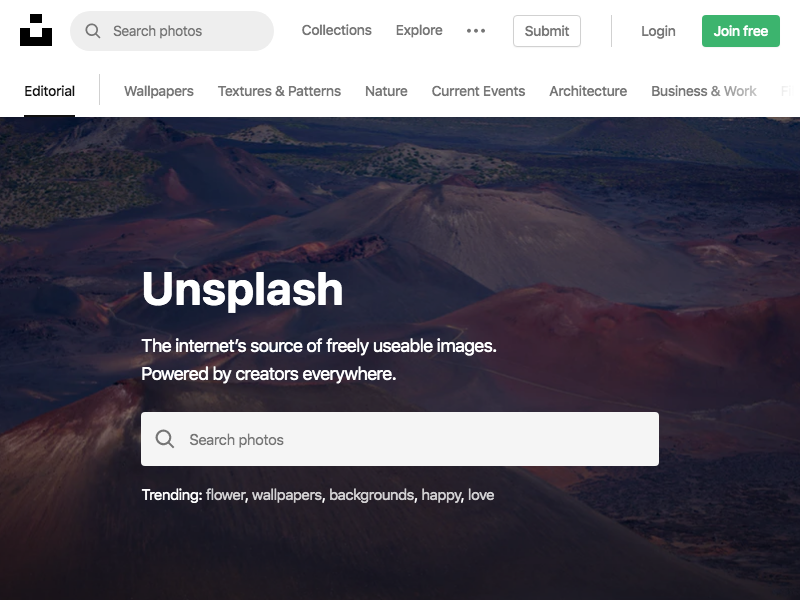
Now after 5–10 seconds you’ll see an unsplash.png file in your project that contains the screenshot of Unsplash. Notice that the viewport is set to 800px x 600px as Puppeteer sets this as the initial page size, which defines the screenshot size. The page size can be customized with Page.setViewport().
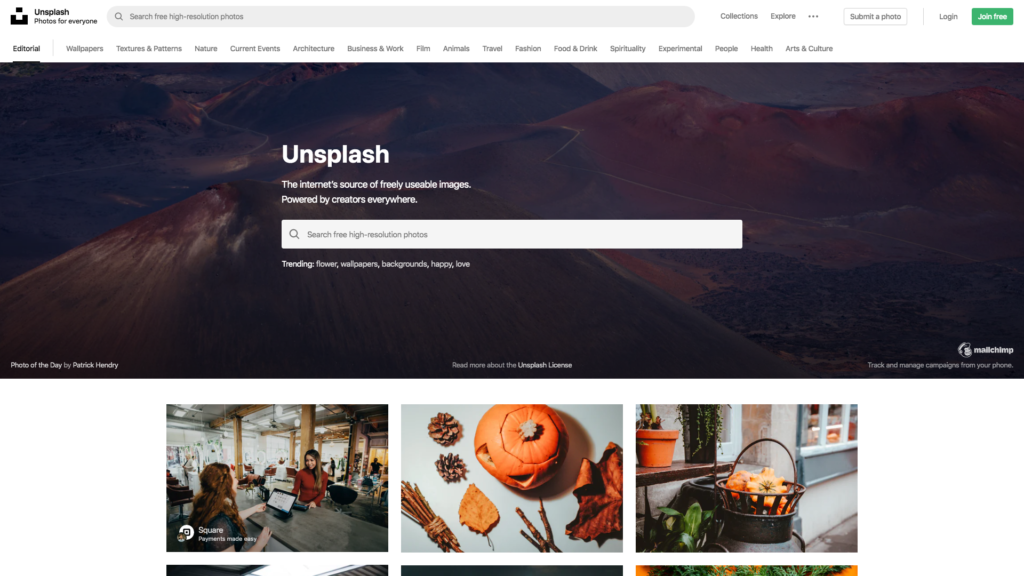
Let’s change the viewport to be 1920px x 1080px. Insert the following code before the goto method:
await page.setViewport({
  width: 1920,
  height: 1080,
  deviceScaleFactor: 1,
})
Now go ahead and also change the filename from unsplash.png to unsplash2.png in the screenshot method like so:
await page.screenshot({ path: 'unsplash2.png' })
The whole screenshot.js file should now look like this:
const puppeteer = require('puppeteer')

const main = async () => {
  const browser = await puppeteer.launch()
  const page = await browser.newPage()
  await page.setViewport({
    width: 1920,
    height: 1080,
    deviceScaleFactor: 1,
  })
  await page.goto('https://unsplash.com')
  await page.screenshot({ path: 'unsplash2.png' })

  await browser.close()
}

main()
The post Getting Started with Puppeteer appeared first on SitePoint.
