
If you’ve ever tried to install Docker for Windows, you’ve probably came to realize that the installer won’t run on Windows 10 Home. Only Windows Pro, Enterprise or Education support Docker. Upgrading your Windows license is pricey, and also pointless, since you can still run Linux Containers on Windows without relying on Hyper-V technology, a requirement for Docker for Windows.
If you plan on running Windows Containers, you’ll need a specific version and build of Windows Server. Check out the Windows container version compatibility matrix for details.
99.999% of the time, you only need a Linux Container, since it supports software built using open-source and .NET technologies. In addition, Linux Containers can run on any distro and on popular CPU architectures, including x86_64, ARM and IBM.
In this tutorial, I’ll show you how to quickly setup a Linux VM on Windows Home running Docker Engine with the help of Docker Machine. Here’s a list of software you’ll need to build and run Docker containers:
- Docker Machine: a CLI tool for installing Docker Engine on virtual hosts
- Docker Engine: runs on top of the Linux Kernel; used for building and running containers
- Docker Client: a CLI tool for issuing commands to Docker Engine via REST API
- Docker Compose: a tool for defining and running multi-container applications
I’ll show how to perform the installation in the following environments:
- On Windows using Git Bash
- On Windows Subsystem for Linux 2 (running Ubuntu 18.04)
First, allow me to explain how the Docker installation will work on Windows.
How it Works
As you probably know, Docker requires a Linux kernel to run Linux Containers. For this to work on Windows, you’ll need to set up a Linux virtual machine to run as guest in Windows 10 Home.
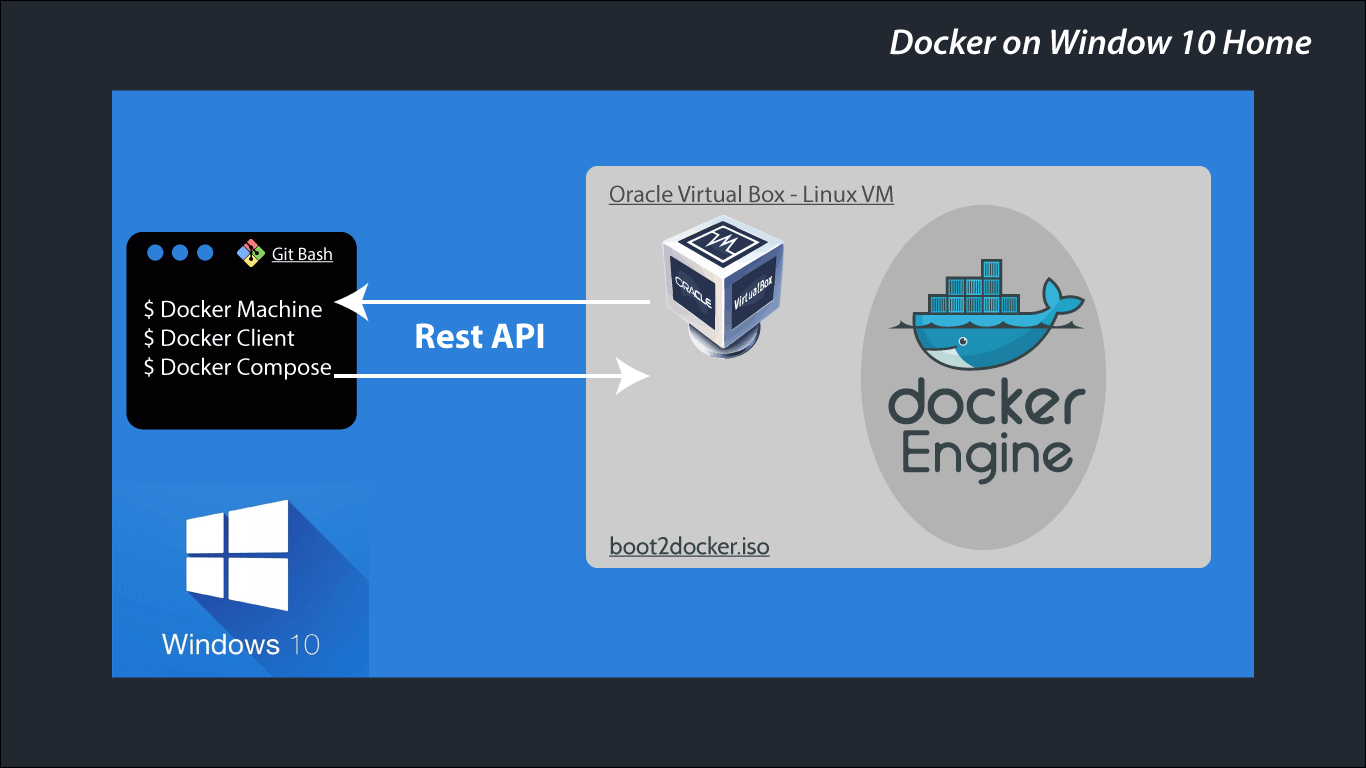
Setting up the Linux VM can be done manually. The easiest way is to use Docker Machine to do this work for you by running a single command. This Docker Linux VM can either run on your local system or on a remote server. Docker client will use SSH to communicate with Docker Engine. Whenever you create and run images, the actual process will happen within the VM, not on your host (Windows).
Let’s dive into the next section to set up the environment needed to install Docker.
Initial Setup
You may or may not have the following applications installed on your system. I’ll assume you don’t. If you do, make sure to upgrade to the latest versions. I’m also assuming you’re running the latest stable version of Windows. At the time of writing, I’m using Windows 10 Home version 1903. Let’s start installing the following:
-
Install Git Bash for Windows. This will be our primary terminal for running Docker commands.
-
Install Chocolatey, a package manager for Windows. It will make the work of installing the rest of the programs easier.
-
Install VirtualBox and its extension. Alternatively, If you have finished installing Chocolatey, you can simply execute this command inside an elevated PowerShell terminal:
C: choco install virtualbox -
If you’d like to try running Docker inside the WSL2 environment, you’ll need to set up WSL2 first. You can follow this tutorial for step-by-step instructions.
Docker Engine Setup
Installing Docker Engine is quite simple. First we need to install Docker Machine.
-
Install Docker Machine by following instructions on this page. Alternatively, you can execute this command inside an elevated PowerShell terminal:
C: choco install docker-machine -
Using Git Bash terminal, use Docker Machine to install Docker Engine. This will download a Linux image containing the Docker Engine and have it run as a VM using VirtualBox. Simply execute the following command:
$ docker-machine create --driver virtualbox default -
Next, we need to configure which ports are exposed when running Docker containers. Doing this will allow us to access our applications via
localhost<:port>. Feel free to add as many as you want. To do this, you’ll need to launch Oracle VM VirtualBox from your start menu. Select default VM on the side menu. Next click on Settings > Network > Adapter 1 > Port Forwarding. You should find thesshforwarding port already set up for you. You can add more like so: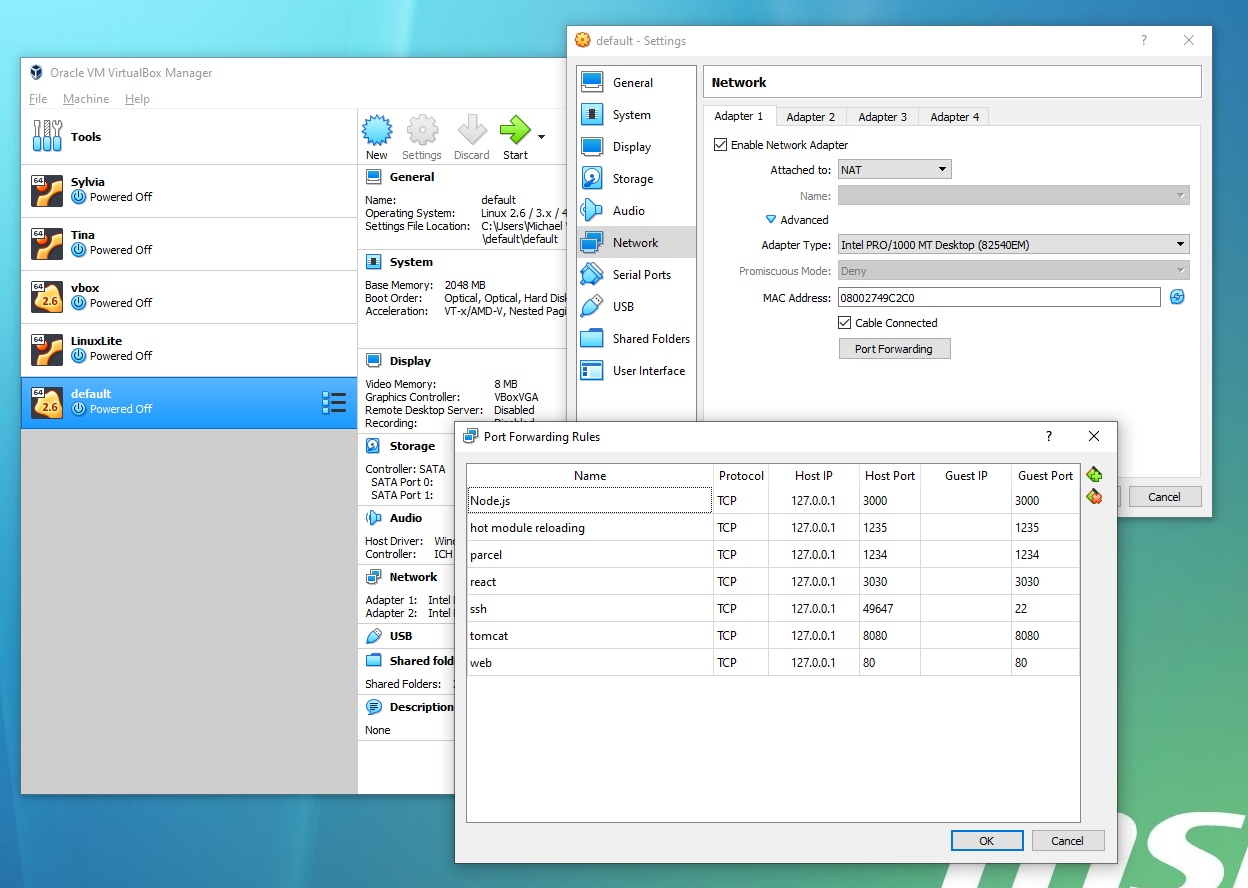
-
Next, we need to allow Docker to mount volumes located on your hard drive. By default, you can only mount from the
C://Users/directory. To add a different path, simply go to Oracle VM VirtualBox GUI. Select default VM and go to Settings > Shared Folders. Add a new one by clicking the plus symbol. Enter the fields like so. If there’s an option called Permanent, enable it.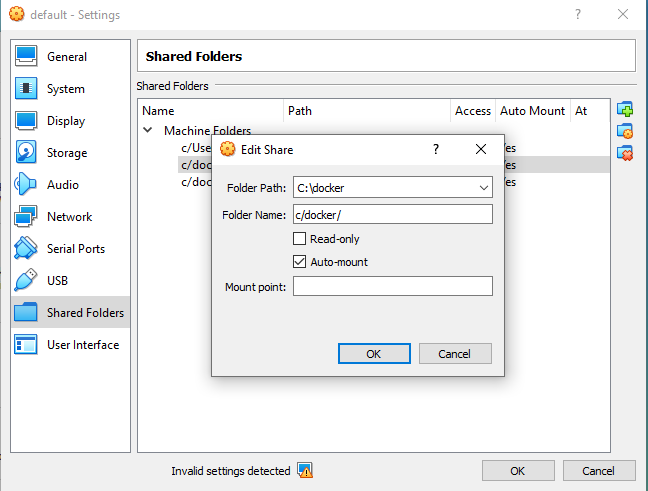
-
To get rid of the invalid settings error as seen in the above screenshot, simply increase Video Memory under the Display tab in the settings option. Video memory is not important in this case, as we’ll run the VM in headless mode.
-
To start the Linux VM, simply execute this command in Git Bash. The Linux VM will launch. Give it some time for the boot process to complete. It shouldn’t take more than a minute. You’ll need to do this every time you boot your host OS:
$ docker-machine start vbox -
Next, we need to set up our Docker environment variables. This is to allow the Docker client and Docker Compose to communicate with the Docker Engine running in the Linux VM,
default. You can do this by executing the commands in Git Bash:# Print out docker machine instance settings $ docker-machine env default # Set environment variables using Linux 'export' command $ eval $(docker-machine env default --shell linux)You’ll need to set the environment variables every time you start a new Git Bash terminal. If you’d like to avoid this, you can copy
evaloutput and save it in your.bashrcfile. It should look something like this:export DOCKER_TLS_VERIFY="1" export DOCKER_HOST="tcp://192.168.99.101:2376" export DOCKER_CERT_PATH="C:UsersMichael Wanyoike.dockermachinemachinesdefault" export DOCKER_MACHINE_NAME="default" export COMPOSE_CONVERT_WINDOWS_PATHS="true"IMPORTANT: for the
DOCKER_CERT_PATH, you’ll need to change the Linux file path to a Windows path format. Also take note that there’s a chance the IP address assigned might be different from the one you saved every time you start thedefaultVM.
In the next section, we’ll install Docker Client and Docker Compose.
The post How to Install Docker on Windows 10 Home appeared first on SitePoint.

