
Wouldn’t it be cool if you could prototype a custom web application that’s responsive (mobile-ready), reactive (light-speed fast), with a full-featured admin interface to manage the content — all in no time? Actually, using Django and Vue.js, you can! 😁
0. Introduction: Full Stack Development 101
I’ll cover how to prototype a custom web app, and to keep it as short and sweet as possible, the context information here will be rather brief. However, I will provide — hopefully — enough resources so that you know where to go should you need more information.
To this end I’ll fully mash up data management, presentation, and routing between Django and Vue.js — so get ready!
About Django
![]()
You may know of Django, the Python-based web framework for perfectionists with deadlines that’s ridiculously fast, reassuringly secure, and exceedingly scalable. But if you don’t know much about it, this article will serve as an extremely fast hands-on introduction.
About Vue.js
![]()
Same deal with Vue.js, the progressive JavaScript framework that’s approachable, versatile, and performant. If you aren’t familiar with it, here you’ll get a quick-and-dirty introduction.
I’ll also cover two official Vue.js libraries:
- Vue Router for route/view mapping
- Vuex for state management
Python + JavaScript = WIN!
![]()
For this article, we’ll set a publishing project with a basic database schema to save authors and articles, and a minimal user interface (UI) to interact with them.
![]()
Hopefully, this will serve as a toy program to understand how to integrate Django using Python code on the back end with a JavaScript framework on the front end, that you can adapt later to your own needs.
1. Setting Up a Django Project
Very quickly, we’ll set up a project from scratch. If you already know how to handle Django projects, you can skip this section. We’ll assume you already have Python installed.
For a more in-depth guide, see How to install Django on the Django documentation site.
Python Virtual Environment
Let’s open a console and create a virtual environment (see Virtual Environments and Packages for more info):
$ virtualenv myenvironment
Using base prefix 'c:\users\luzdealba\appdata\local\programs\python\python37'
New python executable in C:UsersluzdealbaDevelopmentmyenvironmentScriptspython.exe
Installing setuptools, pip, wheel …
done
Don’t mind the paths, as these will change from system to system.
Let’s access and activate the virtual environment.
On Windows:
$ cd myenvironment
$ Scriptsactivate
On macOS and Linux:
$ cd myenvironment
$ source bin/activate
Django Package
Let’s install Django:
(myenvironment) $ pip install django
Collecting django
  Downloading Django-3.0.3-py3-none-any.whl (7.5 MB)
Collecting sqlparse>=0.2.2
  Downloading sqlparse-0.3.1-py2.py3-none-any.whl (40 kB)
Collecting pytz
  Using cached pytz-2019.3-py2.py3-none-any.whl (509 kB)
Collecting asgiref~=3.2
  Downloading asgiref-3.2.3-py2.py3-none-any.whl (18 kB)
Installing collected packages: sqlparse, pytz, asgiref, django
Successfully installed asgiref-3.2.3 django-3.0.3 pytz-2019.3 sqlparse-0.3.1
One more time, don’t mind about program versions and file sizes as these will vary.
The Project
Let’s start a project called myproject:
(myenvironment) $ django-admin startproject myproject
Let’s access the project:
(myenvironment) $ cd myproject
The App
Start an app called myapp:
(myenvironment) $ django-admin startapp myapp
And add myapp.apps.MyappConfig to the INSTALLED_APPS constant list in myproject/settings.py to enable the app.
2. Setting Up the Database with Django
Here we’ll define the back-end database with Django, which we’ll later integrate with a front-end storage with Vuex.
Django Models
Models are Django’s way to implement an object-relational database management system (ORDBMS). In other words, plain text files where you can define database tables and fields, and from where these will propagate to the application layer and the DB engine.
Let’s code the following models for our app in myapp/models.py:
from django.db import models

class Article(models.Model):
    """Table schema to store articles."""
    name = models.CharField(max_length=64)
    author = models.ForeignKey('myapp.Author', on_delete=models.CASCADE)
    content = models.TextField()
    slug = models.CharField(default='', max_length=64)

    def __str__(self):
        return '%s' % self.name

class Author(models.Model):
    """Table schema to store auhtors."""
    name = models.CharField(max_length=64)
    slug = models.CharField(default='', max_length=64)

    def __str__(self):
        return '%s' % self.name
Notice that we implemented a URL slug for both articles and authors.
For more information, see Model API reference on the Django documentation site.
Django Admin
Before we can manage these models through the admin site, we’ll first need to register them so that Django makes them available to us.
Let’s simply edit myapp/admin.py so that it looks like this:
from django.contrib import admin

from .models import Article
from .models import Author

# register models to use in admin site
admin.site.register(Article)
admin.site.register(Author)
Read more about the Django admin site on the Django documentation site.
Django Migrations
From the Django’s Migrations documentation:
Migrations are Django’s way of propagating changes you make to your models (adding a field, deleting a model, etc.) into your database schema.
In short: migrations do everything; no SQL commands required.
First, let’s create the migration files:
(myenvironment) $ python manage.py makemigrations
Migrations for 'myapp':
myappmigrations�001_initial.py
- Create model Author
- Create model Article
Now let’s use that information to update the database:
(myenvironment) $ python manage.py migrate
Operations to perform:
  Apply all migrations: admin, auth, contenttypes, myapp, sessions
Running migrations:
  Applying contenttypes.0001_initial... OK
  Applying auth.0001_initial... OK
  Applying admin.0001_initial... OK
  Applying admin.0002_logentry_remove_auto_add... OK
  Applying admin.0003_logentry_add_action_flag_choices... OK
  Applying contenttypes.0002_remove_content_type_name... OK
  Applying auth.0002_alter_permission_name_max_length... OK
  Applying auth.0003_alter_user_email_max_length... OK
  Applying auth.0004_alter_user_username_opts... OK
  Applying auth.0005_alter_user_last_login_null... OK
  Applying auth.0006_require_contenttypes_0002... OK
  Applying auth.0007_alter_validators_add_error_messages... OK
  Applying auth.0008_alter_user_username_max_length... OK
  Applying auth.0009_alter_user_last_name_max_length... OK
  Applying auth.0010_alter_group_name_max_length... OK
  Applying auth.0011_update_proxy_permissions... OK
  Applying myapp.0001_initial... OK
  Applying sessions.0001_initial... OK
Don’t mind the long list. That’s because that was our first migration, so not only our Author and Article tables were created, but also all of Django’s default schemas.
For more info, see Migration operations in the Django documentation site.
3. A Basic Interface with Vue Components in a Django Template
Here’s one of the most interesting parts of the mashup, as we’ll mix closely related tools from different technologies.
Django View
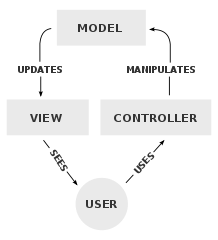
Django goes by the model–view–controller (MVC) software design pattern, which divides the related program logic into three interconnected elements.
We’ll code the following view in myapp/views.py:
Continue reading
How to Prototype a Web App with Django and Vue.js
on SitePoint.
