
If you’re building a web application, you’re likely to encounter the need to build HTML forms on day one. They’re a big part of the web experience, and they can be complicated.
Typically the form-handling process involves:
- displaying an empty HTML form in response to an initial
GETrequest - user submitting the form with data in a
POSTrequest - validation on both the client and the server
- re-displaying the form populated with escaped data and error messages if invalid
- doing something with the sanitized data on the server if it’s all valid
- redirecting the user or showing a success message after data is processed.
Handling form data also comes with extra security considerations.
We’ll go through all of these and explain how to build them with Node.js and Express — the most popular web framework for Node. First, we’ll build a simple contact form where people can send a message and email address securely and then take a look what’s involved in processing file uploads.
As ever, the complete code can be found in our GitHub repo.
Setup
Make sure you’ve got a recent version of Node.js installed. node -v should return 8.9.0 or higher.
Download the starter code from here with Git:
git clone -b starter https://github.com/sitepoint-editors/node-forms.git node-forms-starter
cd node-forms-starter
npm install
npm start
Note: The repo has two branches, starter and master. The starter branch contains the minimum setup you need to follow this article. The master branch contains a full, working demo (link above).
There’s not too much code in there. It’s just a bare-bones Express setup with EJS templates and error handlers:
// server.js
const path = require('path');
const express = require('express');
const layout = require('express-layout');

const routes = require('./routes');
const app = express();

app.set('views', path.join(__dirname, 'views'));
app.set('view engine', 'ejs');

const middlewares = [
  layout(),
  express.static(path.join(__dirname, 'public')),
];
app.use(middlewares);

app.use('/', routes);

app.use((req, res, next) => {
  res.status(404).send("Sorry can't find that!");
});

app.use((err, req, res, next) => {
  console.error(err.stack);
  res.status(500).send('Something broke!');
});

app.listen(3000, () => {
  console.log('App running at http://localhost:3000');
});
The root url / simply renders the index.ejs view:
// routes.js
const express = require('express');
const router = express.Router();

router.get('/', (req, res) => {
  res.render('index');
});

module.exports = router;
Displaying the Form
When people make a GET request to /contact, we want to render a new view contact.ejs:
// routes.js
router.get('/contact', (req, res) => {
  res.render('contact');
});
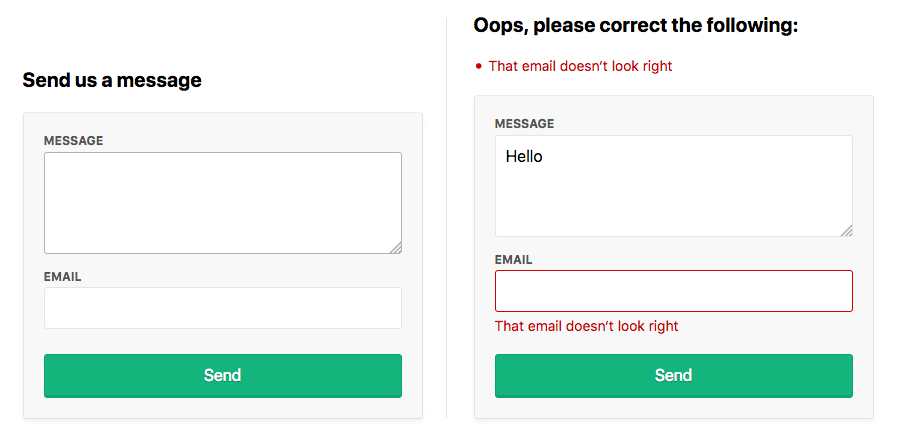
The contact form will let them send us a message and their email address:
Send us a message
See what it looks like at http://localhost:3000/contact.
Form Submission
To receive POST values in Express, you first need to include the body-parser middleware, which exposes submitted form values on req.body in your route handlers. Add it to the end of the middlewares array:
// server.js
const bodyParser = require('body-parser');

const middlewares = [
  // ...
  bodyParser.urlencoded({ extended: true }),
];
It’s a common convention for forms to POST data back to the same URL as was used in the initial GET request. Let’s do that here and handle POST /contact to process the user input.
Let’s look at the invalid submission first. If invalid, we need to pass back the submitted values to the view (so users don’t need to re-enter them) along with any error messages we want to display:
router.get('/contact', (req, res) => {
  res.render('contact', {
    data: {},
    errors: {}
  });
});

router.post('/contact', (req, res) => {
  res.render('contact', {
    data: req.body, // { message, email }
    errors: {
      message: {
        msg: 'A message is required'
      },
      email: {
        msg: 'That email doesn‘t look right'
      }
    }
  });
});
If there are any validation errors, we’ll do the following:
- display the errors at the top of the form
- set the input values to what was submitted to the server
- display inline errors below the inputs
- add a
form-field-invalidclass to the fields with errors.
< % if (Object.keys(errors).length === 0) { %>
Send us a message
< % } else { %>
Oops, please correct the following:
< % Object.values(errors).forEach(error => { %>
- < %= error.msg %>
< % }) %>
< % } %>
Submit the form at http://localhost:3000/contact to see this in action. That’s everything we need on the view side.
Validation and Sanitization
There’s a handy middleware called express-validator for validating and sanitizing data using the validator.js library. Let’s add it to our app.
Validation
With the validators provided, we can easily check that a message and a valid email address was provided:
// routes.js
const { check, validationResult, matchedData } = require('express-validator');

router.post('/contact', [
  check('message')
    .isLength({ min: 1 })
    .withMessage('Message is required'),
  check('email')
    .isEmail()
    .withMessage('That email doesn‘t look right')
], (req, res) => {
  const errors = validationResult(req);
  res.render('contact', {
    data: req.body,
    errors: errors.mapped()
  });
});
Sanitization
With the sanitizers provided, we can trim whitespace from the start and end of the values, and normalize the email address into a consistent pattern. This can help remove duplicate contacts being created by slightly different inputs. For example, ' Mark@gmail.com' and 'mark@gmail.com ' would both be sanitized into 'mark@gmail.com'.
Sanitizers can simply be chained onto the end of the validators:
// routes.js
router.post('/contact', [
  check('message')
    .isLength({ min: 1 })
    .withMessage('Message is required')
    .trim(),
  check('email')
    .isEmail()
    .withMessage('That email doesn‘t look right')
    .bail()
    .trim()
    .normalizeEmail()
], (req, res) => {
  const errors = validationResult(req);
  res.render('contact', {
    data: req.body,
    errors: errors.mapped()
  });

  const data = matchedData(req);
  console.log('Sanitized:', data);
});
The matchedData function returns the output of the sanitizers on our input.
Also, notice our use of the bail method, which stops running validations if any of the previous ones have failed. We need this because if a user submits the form without entering a value into the email field, the normalizeEmail will attempt to normalize an empty string and convert it to an @. This will then be inserted into our email field when we re-render the form.
The post Forms, File Uploads and Security with Node.js and Express appeared first on SitePoint.
