
In this multi-part series, I’ll walk you through how I set up an on-premise machine learning pipeline with open-source tools and frameworks.
Prologue: Model Training is Just A Tiny Part
When most people think about machine learning, they imagine engineers and data scientists tweaking network architectures, loss functions, and tuning hyper-parameters, coupled with the constant retraining until the results are satisfactory.
Indeed, training machine learning models takes a lot of hard work. A tremendous amount of time and resources are expended on research and experimentation.
However, there comes a point in time when you need to start to productionize the model that you’ve lovingly trained and tuned. And oh, by the way, the model is expected to perform as well on next weeks’ batch of data.
It slowly dawns on you that Machine Learning is much bigger than models, hyper-parameters, and loss functions. It’s also what happens before, during, and after training. And it doesn’t end there, because you would also need to think about re-training, especially when you get new data, since there’s no guarantee that the model is going to generalize as well.
There’s a very well known diagram that succinctly illustrates the issue:
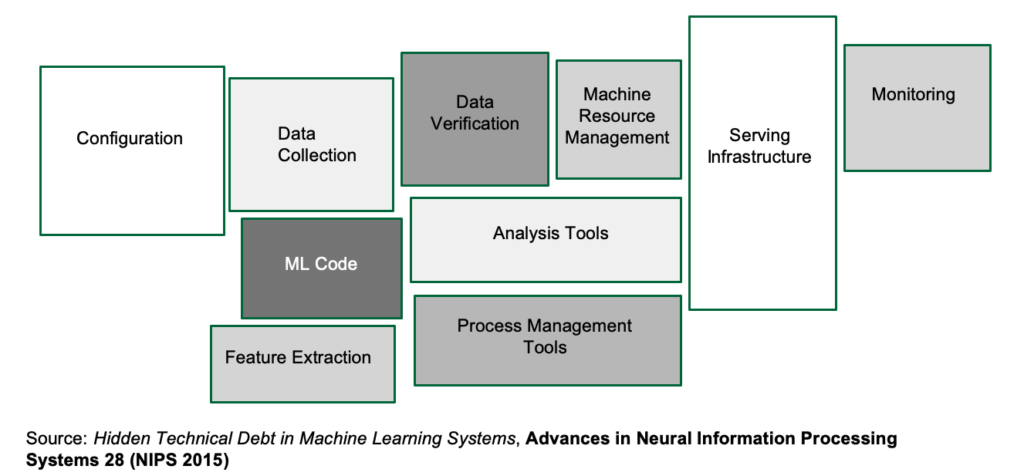
In short, you need to build a machine learning pipeline that can get you from raw data to the trained model in the shortest possible time. But here’s the catch: because you’re part of a scrappy startup and not flushed with VC money, you’re going to have to make do with the servers you have, and not rely on the paid cloud offerings of Amazon, Microsoft or Google, at least for the time being.
This is because you need a safe environment to learn and experiment in — one that won’t unexpectedly shock you with a nasty bill at the end of the month.
Who You Are
You could be a software engineer at a company that’s starting to think about putting its machine learning models to production, or you could be running solo and curious about what “real-world” machine learning looks like. In both cases, you would need to know about machine learning pipelines.
What You Need to Know
You should be comfortable with Linux. The examples will assume Ubuntu Linux 18.04, though slightly dated or more recent versions shouldn’t cause any major issues.
You should have some working knowledge of Docker. If you know how to build images in Docker, and how to execute containers, you should be good to go. If you don’t, you shouldn’t worry too much: I’ll guide you with enough background information, and code examples will be explained.
While this is an article about Machine Learning pipelines, this article is not about the intricacies involved in training a model.
We’re going to use Kubernetes. You don’t need to be an expert in it. If you are completely new to Kubernetes, that’s OK. By the end of the series, you’ll have at least some hands-on experience. On the other hand, I’m not going to go very deep into Kubernetes specifics. Some commands I’ll have to gloss over in the interests of brevity. Besides, the real objective here to help you deploy machine learning pipelines as efficiently as possible.
Here are some other assumptions that I’m making about you, the astute reader:
- you’re not entirely clueless about Machine Learning
- you have access to some relatively beefy servers (ideally more than one) that contain Nvidia GPUs
- you have an existing machine learning code base that’s written in Python
- you don’t work in a unicorn startup or Fortune 500 and therefore are not so flush with cash that you can happily spin up multiple V100s.
What Are We Going to Do?
Machine learning pipelines only recently have gotten more love and attention, and people are just only beginning to figure everything out. Put in another way, there are multiple ways to build machine learning pipelines, because every organization has unique requirements, and every team has their favorite tool.
What this series aims to offer is one possible way to do it, and that’s especially important when you’re starting out, because the amount of information is often very overwhelming. Also, installing Kubernetes is a daunting affair, littered with many roadblocks. I hope this article helps with smoothening that path.
After you’ve learned a way to build a machine learning pipeline, you’ll then be equipped with enough skills and knowledge to go build one to suit your organization’s needs.
Here’s a list of some of the tools I’ll cover in this series:
- Docker
- Kubernetes
- Rancher
- KubeFlow/KubeFlow Pipelines
- Minio
- Tensorflow
On On-premise
As you’ll realize soon as you follow through the series, many of these tools assume that you have storage on Amazon S3 or Google Cloud Storage, which, to put it mildly, not a very good assumption. Thus this series shows how to work around some of these limitations without losing any of the functionality.
Of course, at some point in time, you’ll outgrow and would need something more capable. However, especially when you’re starting (that is, you happen to be the first Data Engineer on the team), then on-premise would seem a more cost-effective and ultimately the more educational choice.
Installing Kubernetes the Easy Way with Rancher
Let’s start immediately with one of the harder bits — Installing Kubernetes.
The main thing you need to know about Kubernetes is that it’s a container-orchestration system for automating application deployment, scaling, and management.
There are many ways to install Kubernetes, and it’s not a trivial process. Fortunately, that’s tools like Rancher make the installation process much more pleasant and less error-prone. In particular, we’re going to use the Rancher Kubernetes Engine (RKE) to help us install Kubernetes.
At the point of this writing, the latest stable release of rke is 1.0.0.
Step 0: Prepare the Machines
The following steps assume that you have access to two Linux machines that are connected to the same LAN.
We’re going to set up a minimal cluster consisting of two machines, one named master and the other worker. Of course, you can name your machines whatever you want, as long as you designate one machine to be master, and the rest to be workers.
If you only have access to one machine, you can get by with creating two virtual machines, and make sure to enable Bridged Adapter. In fact, in preparation for this article, I’m testing everything out of Oracle’s VirtualBox. Here are my settings:

Notice here that I have two VMs: master and node. Enable the Bridged Adapter and also setting Promiscuous Mode to Allow All.
The downside to that is that you wouldn’t be able to access the GPUs, and you would most likely notice that the performance won’t be ideal because Kubernetes tends to be quite demanding in terms of resources. Again, that’s OK if you’re trying this at home or have only access to a single machine at the moment.
Here are some important details about the machines (you should have them on hand too for the configuration steps that follow):
| Master | Worker | |
|---|---|---|
| IP | 192.168.86.36 | 192.168.86.35 |
| User | ubuntu | ubuntu |
| Hostname | master | worker |
| SSH Keys | ~/.ssh/id_rsa.pub |
~/.ssh/id_rsa.pub |
| Role | Control Plane, Etcd | Worker |
DNS and Load Balancing
In a production environment, you would need a hostname to point to your Kubernetes cluster. However, in this article I’m assuming you don’t have one readily available, so we’re going to have to fake it.
Another thing I won’t cover — to keep things simple — is load balancing when it comes to the Rancher installation.
For our purposes, I’m going to use rancher-demo.domain.test as the hostname.
In both machines, open /etc/hosts file:
sudo vim /etc/hosts
Enter the following:
192.168.86.35 worker
192.168.86.35 rancher-demo.domain.test
192.168.86.36 master
127.0.0.1 localhost
Notice here that the worker node has the additional hostname of rancher-demo.domain.test. In a slightly more realistic environment, you’d have something like NGINX as a front-end to load balance between multiple worker nodes.
*Note: If you’re using a Virtual Machine, then most likely you’d be using the Ubuntu Server image, which typically doesn’t come with a desktop environment. Therefore, you should also have an entry in the host computer to include this:
192.168.86.35 rancher-demo.domain.test
That way, you’ll be able to access Rancher from a browser on the host computer.*
Step 1: Obtain the rke Binary
Important!: This step should only be performed on master.
Head over to the GitHub page to download the rke binary. Next, rename the binary to rke, followed by making it executable. Finally, move the binary to a location in the PATH, where /usr/local/bin is usually a good choice.
Important: make sure you select the right binary for your OS!
$ wget https://github.com/rancher/rke/releases/download/v1.0.0/rke_linux-amd64
$ mv rke_linux-amd64 rke
$ chmod +x rke
$ sudo mv rke /usr/local/bin
Now let’s see if everything works:
$ rke
This should return:
NAME:
   rke - Rancher Kubernetes Engine, an extremely simple, lightning fast Kubernetes installer that works everywhere

USAGE:
   rke [global options] command [command options] [arguments...]

VERSION:
   v1.0.0

AUTHOR(S):
   Rancher Labs, Inc.

COMMANDS:
     up       Bring the cluster up
     remove   Teardown the cluster and clean cluster nodes
     version  Show cluster Kubernetes version
     config   Setup cluster configuration
     etcd     etcd snapshot save/restore operations in k8s cluster
     cert     Certificates management for RKE cluster
     encrypt  Manage cluster encryption provider keys
     help, h  Shows a list of commands or help for one command

GLOBAL OPTIONS:
   --debug, -d    Debug logging
   --quiet, -q    Quiet mode, disables logging and only critical output will be printed
   --help, -h     show help
   --version, -v  print the version
The post Machine Learning Pipelines: Setting Up On-premise Kubernetes appeared first on SitePoint.
