In this guide, you’ll learn how to take advantage of Visual Studio Code to supercharge your development workflow.
This article is written for beginners who may be using Visual Studio Code for the first time. VS Code, as it’s commonly known, is considered a “lightweight” code editor. In comparison with full integrated development environment (IDE) editors which occupy gigabytes of disk space, VS Code only uses less than 200MB when installed.
Despite the “lightweight” term, VS Code offers a massive number of features which keep increasing and improving with every new update. For this guide, we’ll cover the most popularly used features. Every programmer has their own tool set which they keep updating whenever new workflows are discovered. If you want to learn every tool and feature VS Code has to offer, check out their official documentation. In addition, you may want to keep track of updates for new and improved features.
Prerequisites
In order to follow along this guide, you need to be proficient in at least one programming language and framework. You also need to be conversant with versioning your project code with git. You’ll also need to have an account with a remote repository platform such as GitHub. I recommend you setup SSH Keys to connect with your remote repo.
We’ll use a minimal Next.js project to demonstrate VS Code features. If you’re new to this, don’t worry, as the framework and the language used are not the focus for this guide. The skills taught here can be transferred to any language and framework that you’re working with.
A Bit of History
If you’re new to programming, I recommend you start with a simple text editor such as Windows NotePad. It’s the most basic text editor and doesn’t offer any kind of help whatsoever. The main advantage of using it is that it forces you to memorize language syntax and do your own indentation. Once you get comfortable writing code, upgrading to a better text editor such as NotePad++ is the next logical step. It offers a bit of essential coding help with features like syntax colorization, auto indentation and basic autocomplete. It’s important when learning programming not to be overwhelmed with too much information and assistance.
Once you’ve gotten used to having a better coding experience, it’s time to upgrade. Not so long ago, these were the fully integrated development environments on offer:
These platforms provide the complete development workflow, from coding to testing and deployment. They contain tons of useful features such as analyzing code and highlighting errors. They also contain a ton more features that many developers weren’t using, though they were essential for some teams. As a result, these platforms took a lot of disk space and were slow to start up. Many developers preferred using advance text editors such as emacs and vim to write their code in.
Soon, a new crop of platform independent code editors started appearing. They were lightweight and provided many features that were mostly exclusive to IDEs. I’ve listed them below in the order they were released:
- Sublime Text: July 2013
- Atom.io: June 2015
- Visual Studio Code: April 2016
Mac developers had access to TextMate which was released in October 2004. The snippets system used by all the above editors originated from TextMate. Having used all of them, I felt that the editor that came after was a significant improvement over the current one. According to a developer survey done by Stack OverFlow in 2019, Visual Studio Code is the most popular code development environment with 50.7% usage. Visual Studio IDE comes second and NotePad++ comes third.
That’s enough history and stats for now. Let’s delve into how to use Visual Studio Code features.
Setup and Updates
Visual Studio Code package installer is less than 100MB and consumes less than 200MB when fully installed. When you visit the download page, your OS will automatically be detected and the correct download link will be highlighted.
Updating VS Code is very easy. It displays a notification prompt whenever an update has been released. For Windows users, you’ll have to click on the notification to download and install the latest version. The download process occurs in the background while you’re working. When it’s ready to install, a restart prompt will appear. Clicking this will install the update for you and restart VS Code.
For Ubuntu-based distributions, clicking on the update notification will simply open the website for you to download the latest installer. A much easier way is simply running sudo apt update && sudo apt upgrade -y. This will update all installed Linux packages including VS Code. The reason this works is because VS Code added its repo to your package repo registry during the initial installation. You can find the repo information on this path: /etc/apt/sources.list.d/vscode.list.
User Interface
Let’s first get acquainted with the user interface:
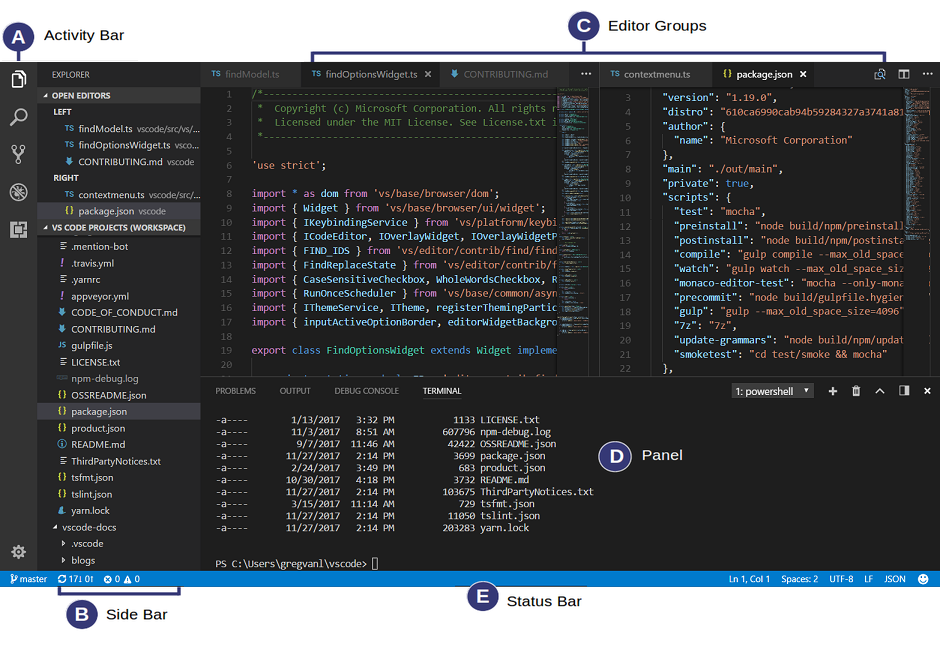
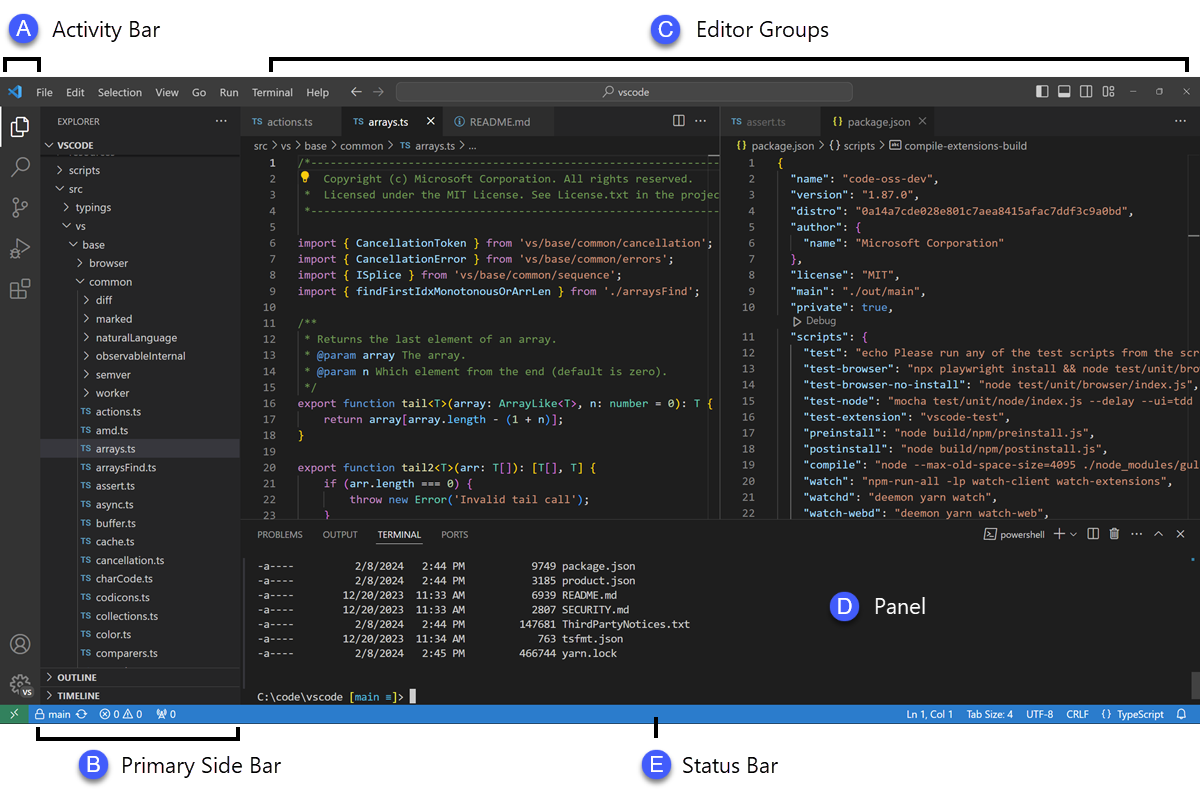
VS Code’s user interface is divided into five main areas which you can easily adjust.
- Activity Bar: allows you to switch between views: explorer, search, version control, debug and extensions.
- Side Bar: contains the active view.
- Editor: this is where you edit files and preview markdown files. You can arrange multiple open files side-by-side.
- Panel: displays different panels: integrated terminal, output panels for debug information, errors and warnings.
- Status: displays information about the currently opened project and file. Also contains buttons for executing version control actions, and enabling/disabling extension features.
There’s also the top Menu Bar where you can access the editor’s menu system. For Linux users, the default integrated terminal will probably be the Bash shell. For Windows users, it’s PowerShell. Fortunately, there’s a shell selector located inside the terminal dropdown that will allow you to choose a different shell. If installed, you can choose any of the following:
- Command Prompt
- PowerShell
- PowerShell Core
- Git Bash
- WSL Bash
Working with Projects
Unlike full IDEs, VS Code doesn’t provide project creation or offer project templates in the traditional way. It simply works with folders. On my Linux development machine, I’m using the following folder pattern to store and manage my projects:
/home/{username}/Projects/{company-name}/{repo-provider}/{project-name}
The Projects folder is what I refer to as to the workspace. As a freelance writer and developer, I separate projects based on which company I’m working for, and which repo I’m using. For personal projects, I store them under my own fictitious “company name”. For projects that I experiment with for learning purposes, and which I don’t intend to keep for long, I’ll just use a name such as play or tuts as a substitute for {repo-provider}.
If you’d like to create a new project and open it in VS Code, you can use the following steps. Open a terminal and execute the following commands:
$ mkdir vscode-demo
$ cd vscode-demo
# Launch Visual Studio Code
$ code .
You can also do this in File Explorer. When you access the mouse context menu, you should be able to open any folder in VS Code.
If you want to create a new project linked to a remote repo, it’s easier creating one on the repo site — for example, GitHub or BitBucket.
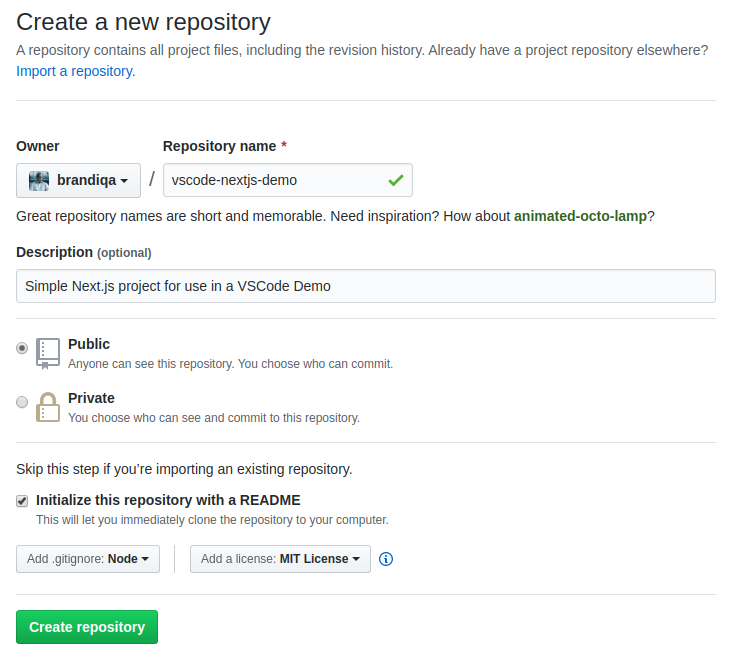
Take note of all the fields that have been filled in and selected. Next, go to the terminal and execute the following:
# Navigate to workspace/company/repo folder
$ cd Projects/sitepoint/github/

# Clone the project to your machine
$ git clone git@github.com:{insert-username-here}/vscode-nextjs-demo.git

# Open project in VS Code
$ cd vscode-nextjs-demo
$ code .
Once the editor is up and running, you can launch the integrated terminal using the keyboard shortcut Ctrl+~ (tilde key). Use the following commands to generate package.json and install packages:
# Generate `package.json` file with default settings
$ npm init -y

# Install package dependencies
$ npm install next react react-dom
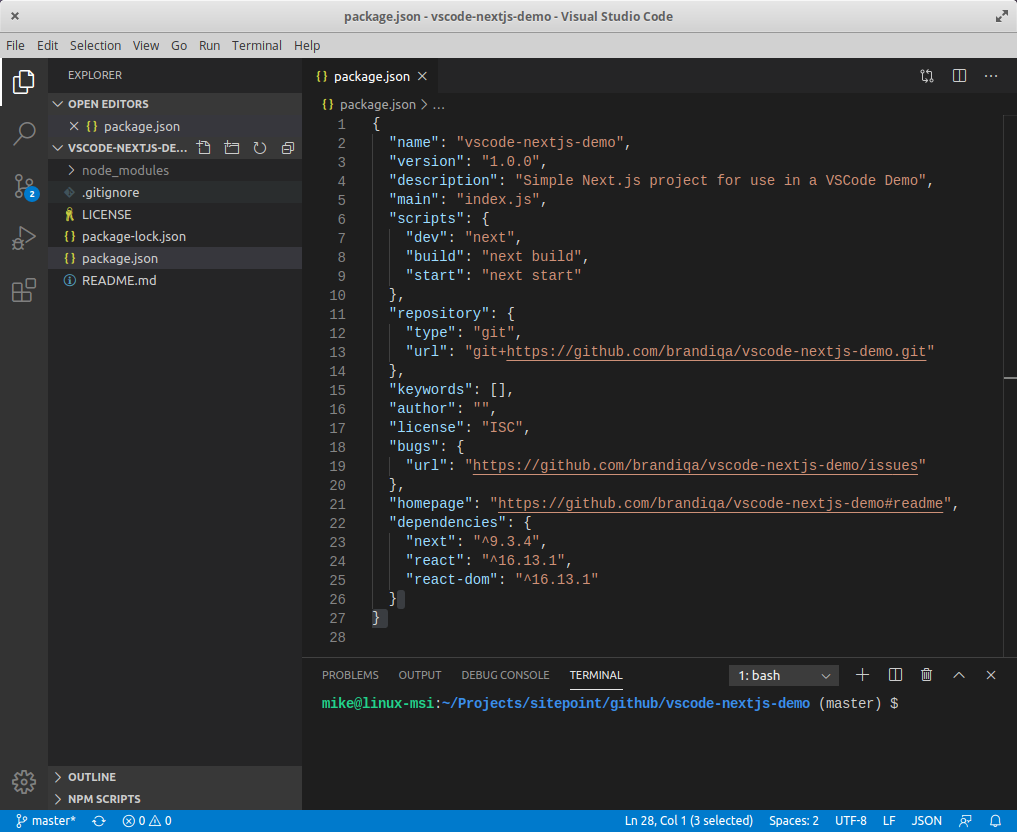
Next, open package.json and replace the scripts section with this:
"scripts": {
  "dev": "next",
  "build": "next build",
  "start": "next start"
}
The entire VS Code window should look like this:
Before we look at the next section, I’d like to mention that VS Code also supports the concept of multi-root workspaces. If you’re working with related projects — front-end, back-end, docs etc. — you can manage them all in a single workspace inside one editor. This will make it easier to keep your source code and documentation in sync.
Version Control with Git
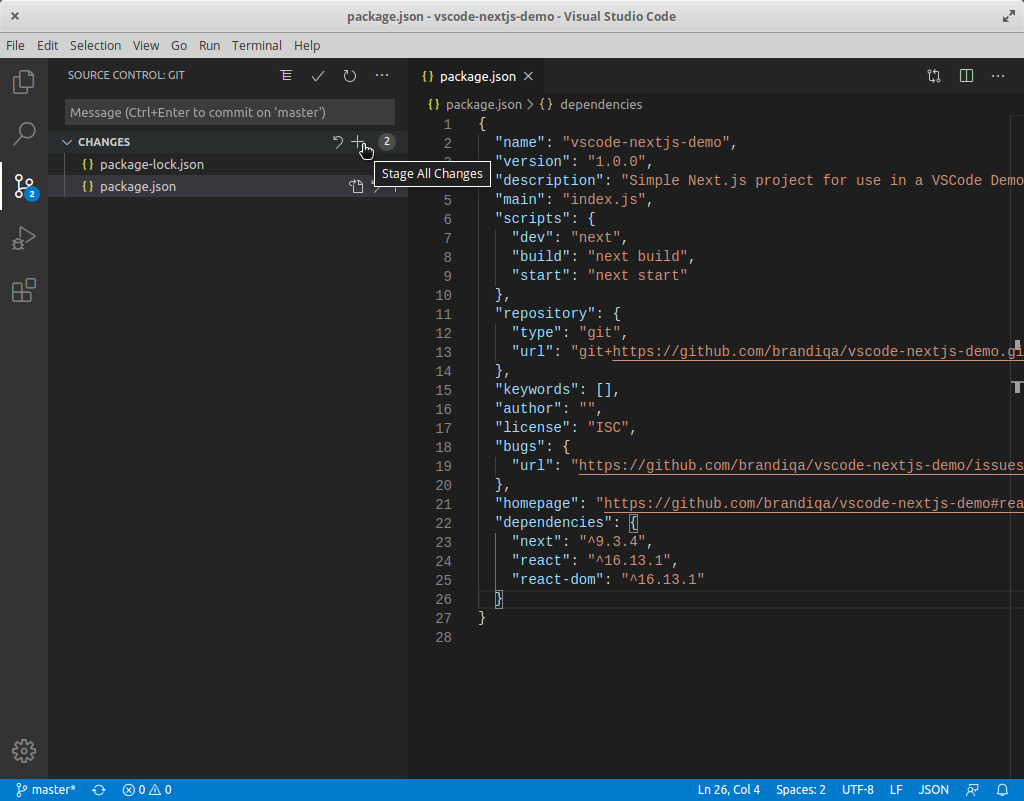
VS Code comes built-in with Git source control manager. It provides a UI interface where you can stage, commit, create new branches and switch to existing ones. Let’s commit the changes we just did in our project. On the Activity bar, open the Source Control Panel and locate the Stage All Changes plus button as shown below.
Click on it. Next, enter the commit message “Installed next.js dependencies”, then click the Commit button at the top. It has the checkmark icon. This will commit the new changes. If you look at the status located at the bottom, you’ll see various status icons at the left-hand corner. The 0 ↓ means there’s nothing to pull from the remote repo. The 1 ↑ means you’ve got one commit you need to push to your remote repo. Clicking on it will display a prompt on the action that will take place. Click OK to pull and push your code. This should sync up your local repo with the remote repo.
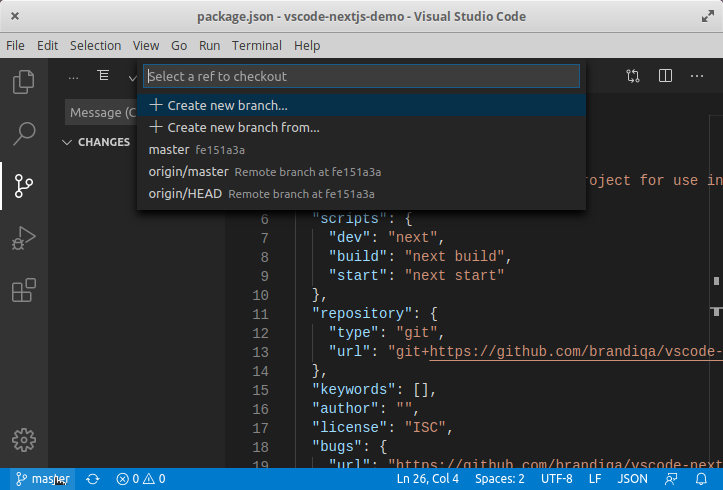
To create a new branch or switch to an existing branch, just click the branch name master on the status bar, left bottom corner. This will pop up a branch panel for you to take an action.
Do check out the following extensions for an even better experience with Git:
Support for a different type of SCM, such as SVN, can be added via installing the relevant SCM extension from the marketplace.
Creating and Running Code
On the Activity Bar, head back to the Explorer Panel and use the New Folder button to create the folder pages at the root of the project. Select this folder and use the New File button to create the file pages/index.js. Copy the following code:
function HomePage() {
  return <div>Welcome to Next.js!</div>;
}

export default HomePage;
With the Explorer Panel, you should see a section called NPM Scripts. Expand on this and hover over dev. A run button (play icon) will appear next to it. Click on it and this will launch a Next.js dev server inside the Integrated Terminal.
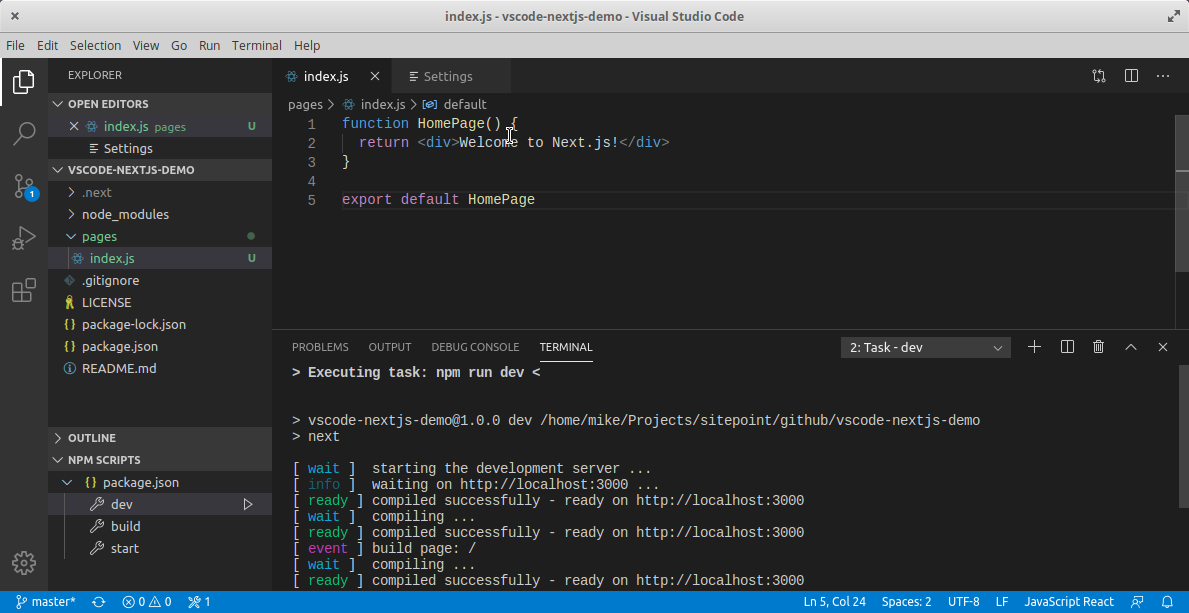
It should take a few seconds to spin up. Use Ctrl + Click on the URL http://localhost:3000 to open it in your browser. The page should open successfully displaying the “Welcome” message. In the next section, we’ll look at how we can change VS Code preferences.
The post Visual Studio Code: A Power User’s Guide appeared first on SitePoint.
